Legoaizer -
Help Legoaizer -
Help |
Legoaizer -
Help
Piet Mondriaan
Mondriaan
is a very, very special kind of function in Legoaizer. And also an odd one
because it's not really a new feature of Legoaizer, but rather a bonus from the
application development team... we like the Mondriaan paintings so much, we
wanted to make a brick version
of it. So here it is, for you. Like it or ignore it.
We like it.
What is Piet
Mondriaan?
The right question should be: who is
Piet Mondriaan. According to Wikipedia:
"Pieter Cornelis (Piet) Mondriaan, after 1906 Mondrian, 7 March 1872 – 1 February
1944), was a Dutch painter.
Mondrian was
a contributor to the De Stijl art movement and group, which was founded by
Theo van Doesburg. He evolved a non-representational form which he termed neoplasticism. This consisted
of white ground, upon which he painted a grid of vertical and horizontal black lines
and the three primary colors. Mondrian's arrival in Paris from the Netherlands in
1911 marked the beginning of a period of profound change. He encountered
experiments in Cubism and with the intent of integrating himself within the
Parisian avant-garde removed an 'a' from the Dutch spelling of his name
(Mondriaan)"
The Mondriaan function is activated by pressing the
'Piet Mondriaan' button on the left. This will show a new functional
area:
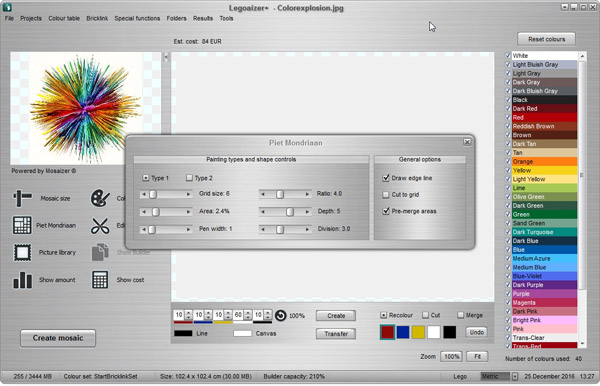
The familiar pop-up window has a couple of size and shape
parameters, while the console at the bottom has colour parameters. The following
functions apply: Two types of painting styles Type 1:
divisions are created by creating 4 new areas, where areas are painted according
to the colour distribution. Some of the shape settings
(explained hereafter) for both types are the same, some are different or
have no equivalent. Shape settings for Type
1 Shape settings for Type
2 General
options
The colour controls
console
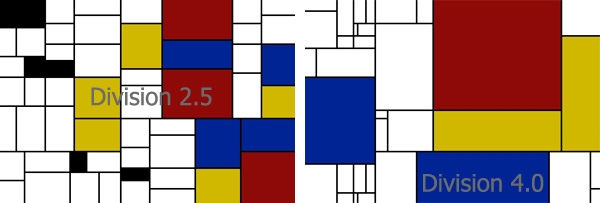
There are three buttons. 'Create' will create a new painting with the current
settings. Each time you press this button a certain randomisation will ensure
that each painting is truly unique. 'Transfer': to transfer the painting to the
source file, where the painting is now the new
source file for any mosaic creation next steps. The third button is the 'Undo' button of a post-processing
action. There are 20 undo steps: when the 21st change is created the first will
be deleted. An alternative way to undo is to press the CTRL+Z
buttons (a common Windows undo-key combination). The three radio-buttons at the bottom will allow for
three different post-processing actions. They are all managed by pressing,
dragging and moving the mouse. Pressing is always left-button, dragging is
moving the mouse while pressing the left-button; moving is just moving (but the
area that will become active is the area which is currently
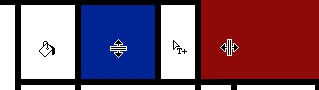
below the cursor position): Post-processing cursors. From left to right:
Recolour, Cut horizontal, Merge, Cut vertical
Area and line
colours
The area
colours are shown as 5 coloured lines (below each arrow control).
The 5 arrow controls together to determine the relative contribution of the
colour to the surface
colours. This means: a value of 52% (e.g. white) will try
to paint 52% of the areas white. When the sum of the colour contribution values doesn't add up to 100%,
the canvas colour will become visible.
The sequence of colouring
is from left to right: from red to black, where for Type 1 the areas are
pre-sorted from largest to smallest. So, for Type 1 paintings the largest areas
are typically red, while the smallest areas are typically black. For Type 2
paintings the application will try to fill the same relative colour
contributions, but less accurate as compared with Type 1. The default colours
are: red, blue, yellow, white and black. When you click on a coloured line
below the arrow control you can redefine that colour. When pressing the 'reset' icon you will reset each of
the 7 colours to their defaults. The other two colour patches are for the line colour
(drawing each area) and the canvas colour (the base colour of the canvas before
actually placing coloured areas in the canvas. The functions in the menu
bar
There are two additional functions available from the
menu bar ('Projects'): 'Save
Mondriaan' and 'Open Mondriaan'. These two
functions will save the current Mondriaan painting design, or open an existing
design. The project will not contain the brick blueprint, only the area
size, placement and colour. Upon loading it will
set all the Mondriaan specific parameters, and show the Mondriaan painting. You still need to
create the mosaic. You can however edit (cut, merge, recolour) as
any other normal Mondriaan painting. Via the 'File' menu you can also save the Mondriaan painting as
an uncompressed bitmap (and only as a bitmap format
to avoid jpeg compressing colour blurring). This way you will be able to save the
Mondriaan painting and use it for other purposes, or whatever is
useful to post-process outside Legoaizer. 
Type 2: horizontal and vertical lines are
created where some areas are merged, and lines are broken into parts. All
created at random.
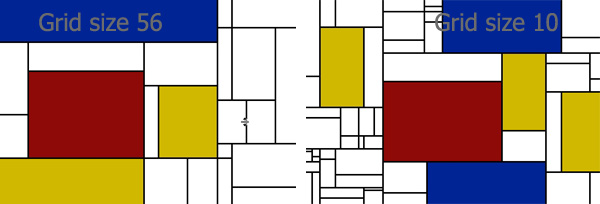
Grid
size: the size of the minimum width or height of an area, in pixels.
The smaller the grid size, the more areas can be created. But also: the larger
the painting size, the smaller the relative area size will
automatically become. An example is shown below:
Area: the minimum area size in pixels 'squared'
(width x height) in percentage of the total area (width x height of the
resulting painting bitmap) that must be filled with coloured areas.
Pen
width: the width of the lines in the painting. The line colour default
is black, but can also be defined using the 'General options' button.
Ratio: the relative placement of new areas as a
ratio of the original areas size and where the area will be cut in two parts.
For instance: a ratio of 3 will try to cut an area in two parts where the cut
takes place at about 1/3 of the original line length. Note: technically the
line length ratio of the two new lines is then 2:1, or 1/3 and 2/3 of the
original length. The higher this value the taller the (longest) new area
can become. An example of the effect of this parameter is shown here:

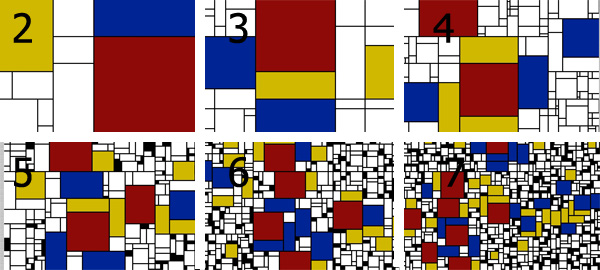
Depth: the amount of attempts to cut an area
into two new areas. For small dimensions, and for large grid sizes this value
will hardly have effect, but for large dimensions and relatively small grid
sizes this value will create a very fine mesh of areas. An example is shown
below for a 1200 x 800 pixel painting:
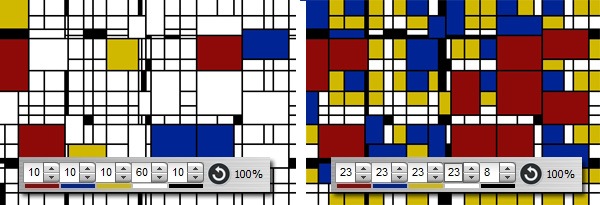
Division: similar to 'Ratio', but this parameter will also check if a
area which is split lengthwise will not become too long compared to the new
width. In case the new split creates to very long areas (and thus very small
width) it will not split this the area, and continues to the next area
instead. A low value will therefore force almost identical areas when split,
while a high value will create many beam-like areas. An example of the effect
of the division parameter is shown below:
Similar to Type 1 for 'Grid size' and
'Pen width'
while 'Depth' and 'Division' are both greyed out.
The 'Area' now means the amount of cells that is
merged at random. This value indicates how much (as % of the total area) must
be forced into a new area, where lines are now broken, and adjacent areas are
created.
The 'Ratio' parameter is now called 'Surface' where the amount of areas
must be coloured using the 5 colours. This includes white, so at first it
appears like hardly anything has been coloured. If this value is set to
the maximum value (80%) and the relative percentage of white is set to a low
value, the amount of coloured boxes is actually (approximately) 80% indeed.
See example below (the active colour distribution is added in each picture as
a shaded box):
'Pre-merge
areas: this option will attempt to pre-merge adjacent areas as much as
possible. It will only try this in one 'wave', meaning: only one attempt for
each area, meaning: only one time per original area after the full painting
was created. When two areas merge, the area that wasn't yet merged earlier
will then be skipped in a new merge.
'Draw edge line': this will also create a line around the edge of the
painting.
'Cut to
grid': when cutting a new line this option will attempt to cut the new
line in the same grid as of the original areas. It's not guaranteed
however that it will precisely put the new line at exactly the same spot as
the line in the adjacent area. This option will however try the best
possible.
Cut:
this will cut the current area (i.e. the area below the cursor) in two
parts, adding a new line. The colours of both new areas will be the same
as the original (uncut) area. The default cut direction is East-West
(horizontal). When the CTRL key is pressed the cursor will change to a
North-South cursor, and a vertical cut is made.
Merge : two cells can be merged. To merge two
cells you need to move your cursor over the first area, press the left
mouse-button, and drag the mouse to the second area, adjacent to your first selected
area. Then release the mouse button. The two areas will be merged. This only
works when two adjacent cells have the same width (vertical merging) or height
(horizontal merging). When two areas cannot be merged, nothing will happen. The
colour of the new area takes the same colour of the first selected area. You can move the merge movement
in any direction: North, South, East or West. You can combine existing and new
combinations as much as you want. For instance, the blue box in the picture
above can be merged with the two white parts left of it: first merge the two
white, then merge the new white part with the blue (or vice versa to make the
new area blue).
Recolour: a cell can be recoloured. The selected
colour is selected by clicking on the colour patch at the bottom of the tab.
The selected colour is highlighted by the turquoise rectangle around that
patch box. You can recolour the same cell multiple times, the undo
will repair the last
step.